Show me Tell me Questions
Examiner's Car 'Tell me, Show me' Vehicle Safety Questions
As part of your practical driving test the examiner will ask you a vehicle safety question, known as 'Show Me, Tell Me' questions, but you will be asked only: -
- One (1) ‘Tell Me’ question (where you explain how you’d carry out a safety task) at the start of your test, before you start driving
- One (1) ‘Show Me’ question (where you show how you’d carry out a safety task) while you’re driving
There are currently fourteen (14) 'Tell Me' questions, and eight (8) 'Show Me' questions which the examiner can ask you, but you will need to answer only one (1) of each. Essentially, these questions are testing your knowledge on basic car maintenance and safety.
The driving test examiner will ask you the 'Tell Me' question at the start of the practical test, and the 'Show Me' question whilst driving on the road. You can score a serious fault or a dangerous fault if you lose control of the vehicle while responding to the 'Show Me' question, so only answer the question when its safe to do so.
You will gain a driving test fault if you answer any one of these two questions incorrectly.
Listed below are the possible 'Show Me' and 'Tell Me' questions with answers. Watch the videos for an expanded explanation.
‘Tell Me’ example questions
1. Tell me how you’d check the brakes are working before starting a journey.
(a) Brakes should not feel spongy or slack. Certainly, it shouldn't be pressed right to the floor. Neither should it feel hard. Brake pedal pressure should feel firm and provide some resistance. Test your brakes as you set off and before you build up too much speed.
(b) If you're brakes are working properly, the vehicle should not pull to one side when braking.
2. Tell me where you’d find the cars recommended tyre pressures and how you'd check each tyre.
(a) Check in the car's manual, or online in the manufacturer's guide, what the correct tyre pressure is.
(b) Use a reliable pressure gauge. Check and adjust pressures when tyres are cold. Do NOT check tyres when they are warm as the temperature will change.
(c) Do NOT forget to check the spare tyre.
(d) Remember to refit valve caps.
3. Tell me how you'd make sure your head restraint is correctly adjusted so it provides the best protection.
(a) Adjust the head restraint so the rigid top part of the head restraint is at least as high as the eye or top of your ears.
(b) Make sure the head restraint is as close to the back of your head as is comfortable. Note: Some restraints might be adjustable.
4. Tell me how you’d check the tyres have sufficient tread depth and are in a safe condition.
(a) Check the sidewalls and tread for no cuts and bulges (you may have to turn your wheels outwards to do this).
(b) Check you have at least 1.6 mm tread depth (using a gauge) across the central three-quarters (3/4) of the breadth of the tyre, and around the entire outer circumference of the tyre.
5. Tell me how you’d check the headlights and tail lights are working.
(a) Operate the switch (turn on ignition if necessary) to turn the lights on. Check green warning light on the dashboard, which indicates your low beam lights are on. Make sure the blue high beam light is off.
(b) Then explain to the examiner that to check the lights you would get out the car and walk around to physically check for yourself. As this is a ‘tell me’ question though, you don’t need to actually get out and check the lights.
6. Tell me how you’d know if there was a problem with your anti-lock braking system.
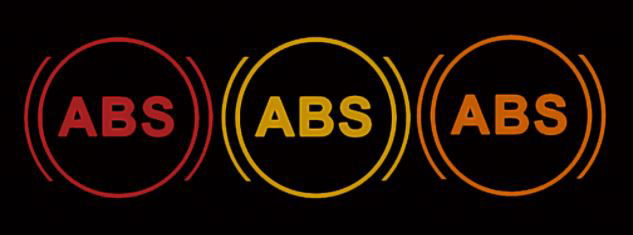
(a) The ABS warning light should illuminate on the dashboard if there was a fault with the Anti-lock Braking System (ABS).
7. Tell me how you’d check the indicators are working.
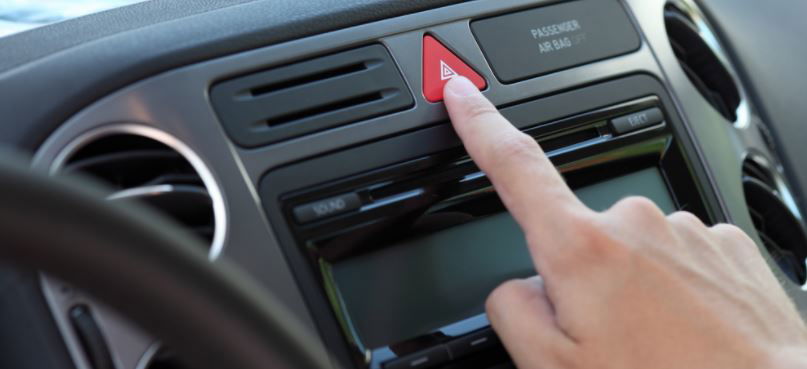
(a) Operate the switch, by turning the hazard warning lights on (turn ignition on, if necessary)
(b) Then walk around the car and check the indicators are working.
You'll see the green indicator lights flash on the dashboard when they are activated. Some vehicles have a small light visible in the wing mirror. If an indicator bulb is blown, the indicators might blink very quickly.
As this is a ‘tell me’ question, you don’t need to physically get out the car to check the lights are actually working.
8. Tell me how you’d check the brake lights are working.
(a) Press the brake pedal.
(b) To check the brake lights are working whilst you have your feet on the brake pedals, you will need to ask someone to help you, to check if the rear brake lights come on. Alternatively, you can check yourself by parking, and facing away from something reflective, like windows and doors. You'll be able to see the brake lights in the glass reflections.
9. Tell me how you’d check the power steering is working before starting a journey.
If the steering becomes heavy, the power-steering system may not be working properly. Before starting a journey, 2 simple checks can be made.
(a) After turning on the ignition, move the steering wheel left and right, it should move with ease. Also, with the engine started, gentle pressure on the steering wheel should result in a slight but noticeable movement as the system begins to operate.
(b) You can also turn the steering wheel just after moving off, it will give an immediate indication whether the power assistance is functioning. So just after moving away, turn the wheel and check to make sure that the steering is light. If it feels unusually heavy you've either got a flat tyre or the power steering is faulty. Keep in mind that low fluid can cause the power steering to fail.
10. Tell me how you’d switch on the rear fog light(s) and explain when you’d use them.
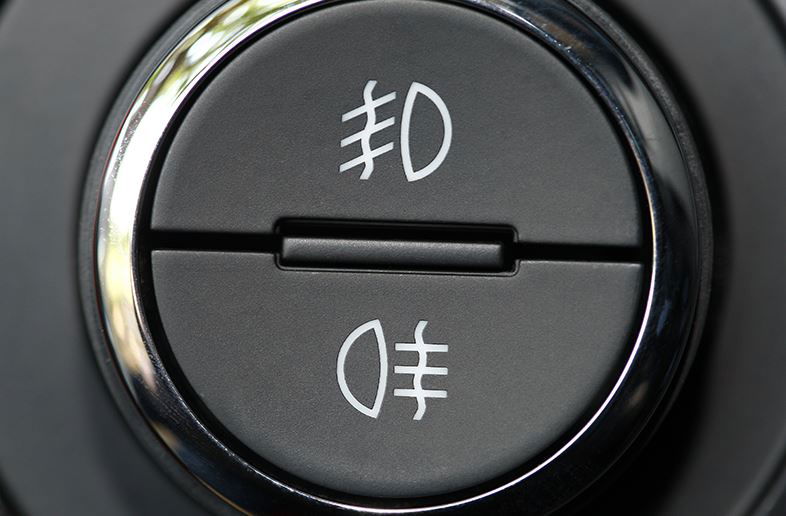
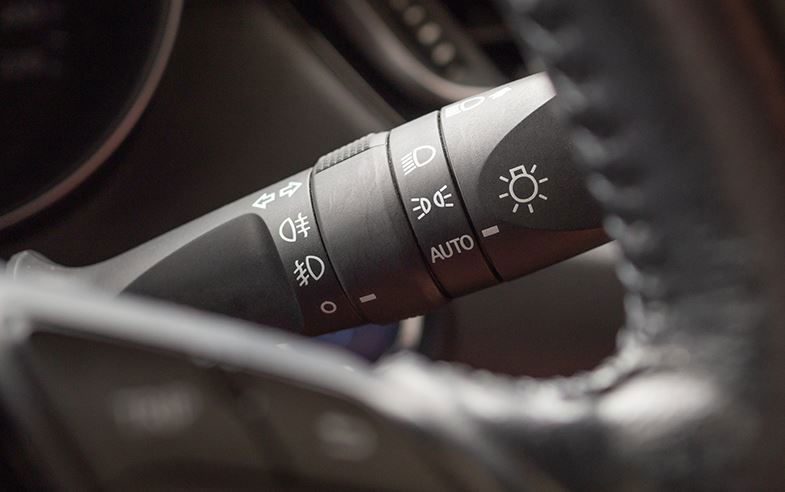
(a) Turn on ignition, and operate the switch by turning on the dipped head lights, then turn the fog light switch to on. Most cars will either have a collar on the lights stalk, or a separate button with the fog light symbol.
(b) Check the fog light warning indicator on your dashboard is on.

(c) Tell the examiner, fog lights must only be switched on (i) when visibility is seriously reduced; (ii) when you can't see more than 100 meters
(d) Keep your lights on low beam (if necessary)
11. Tell me how you switch your headlight from dipped to main beam and explain how you’d know the main beam is on.
(a) Turn ignition on, operate switch to turn your dipped headlights on.
Note: Activate main beam headlights, either by pulling the lights stalk back or pushing it forwards.
(b) Check the main beam blue warning light on the dashboard is on.

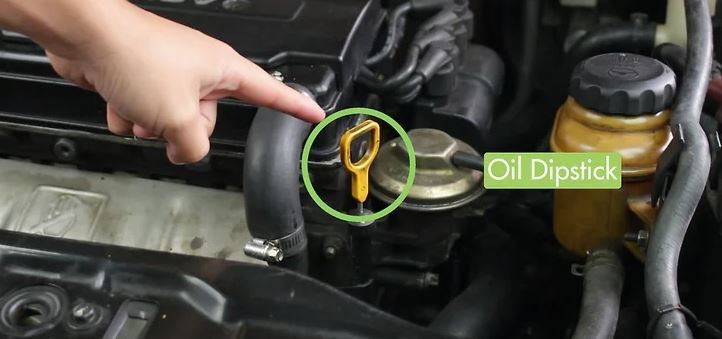
12. Open the bonnet and tell me how you’d check that the engine has sufficient oil.
(a) Find and identify the oil dipstick (or oil level indicator) and pull it out.
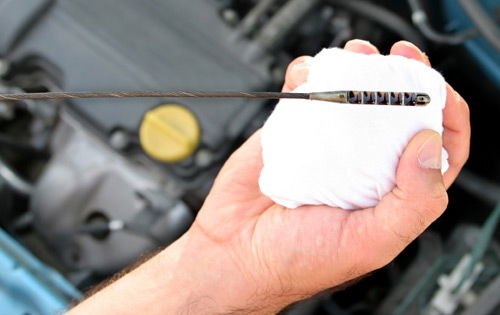
(b) Wipe the oil dipstick clean with a cloth. Then put it back in the holder, and pull it out again.
(c) Check the oil indicator is between the high and low level markers.
Describe how you check the oil level against the minimum and maximum markers.
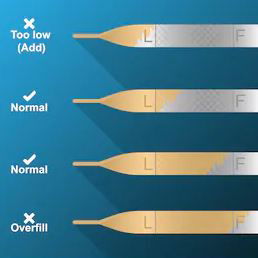
(d) If the oil is low, top it up.
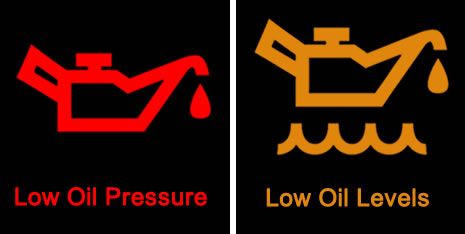
Warning: If this LOW OIL LEVEL warning light comes on you should pull over immediately (assuming it's safe to do so); continuing on could cause your engine to seize.
Warning: Don't overfill the engine with oil as you could damage the engine.
13. Open the bonnet and tell me how you’d check the engine has sufficient engine coolant.
(a) Identify the Engine Coolant under the bonnet. Look for the right type of cap.
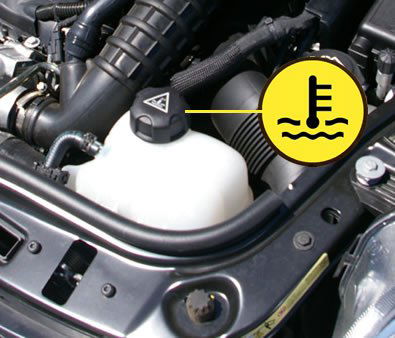
(b) Note the max and min level marking indicators on the header tank reservoir. You shouldn't need to open the cap. There is no dipstick in the engine coolant reservoir. After identifying the high and low level markings on the header tank, where fitted, or radiator filler cap, describe how to top up to correct level.
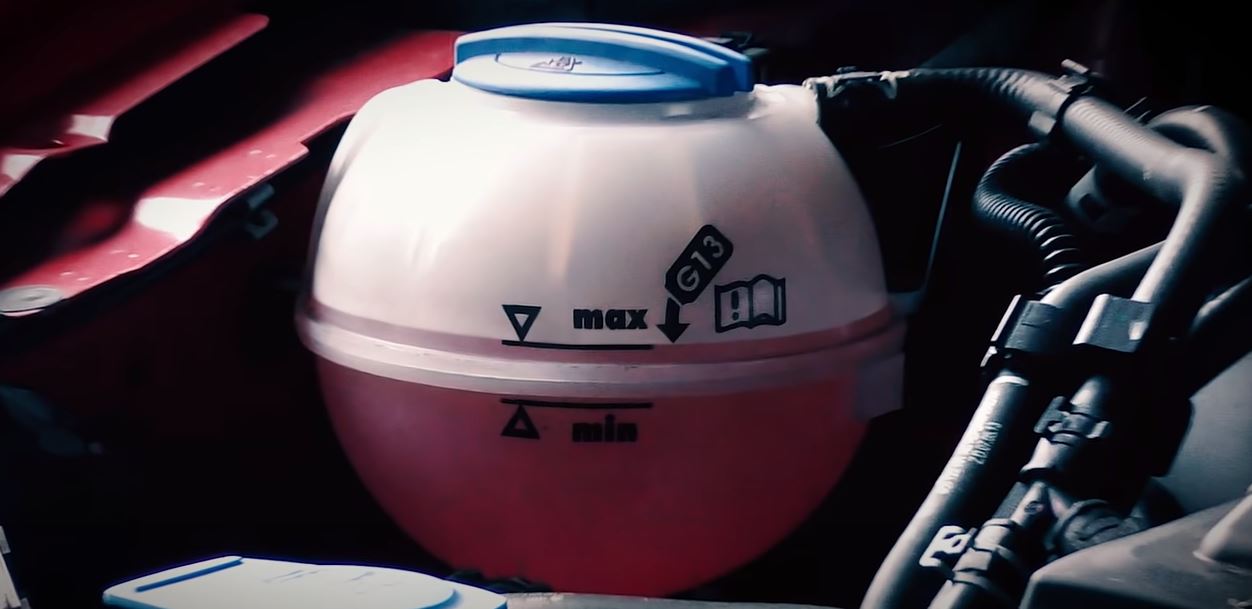
(c) If the levels are low, top it up with a water and anti-freeze mix, but only when the engine is cold. You could get a serious injury if you try to open the cap when it is hot.
Note: The engine should be off. Once you have found the reservoir (look for the right type of cap), simply read the level from the side.
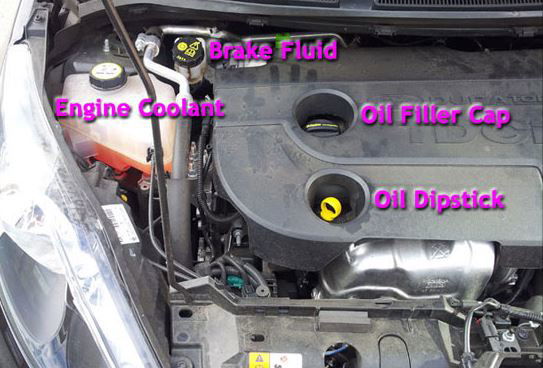
14. Open the bonnet and tell me how you’d check that you have a safe level of hydraulic brake fluid.
(a) With the engine off, identify the reservoir, and check the fluid level is between the max (high) and min (low) level marks on the reservoir.
(b) If it's low, top it up with the correct fluid. You can find this out in your car manual.
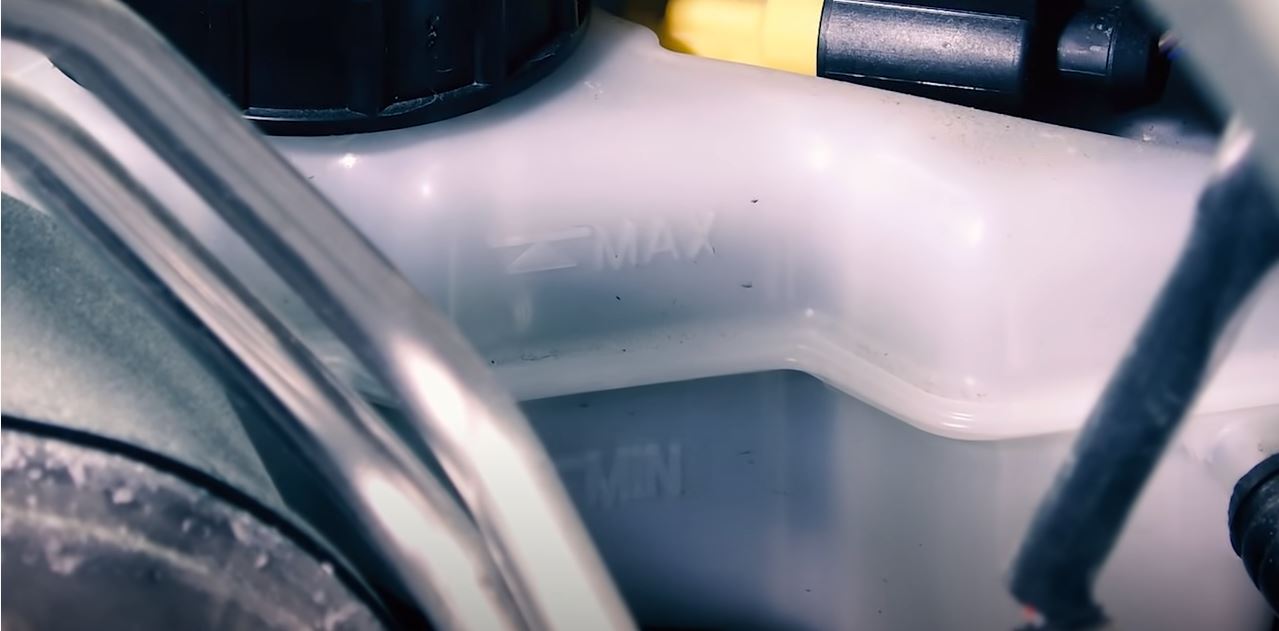
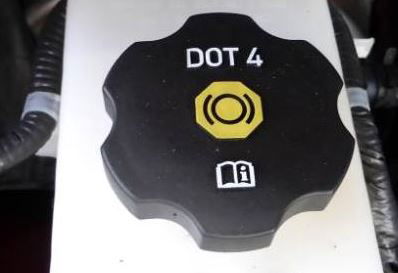
Under the bonnet, know how to identify the brake fluid reservoir cap and you will identify the hydraulic brake fluid tank. The brake fluid reservoir often has the type of fluid it takes printed on the cap.
N.B. For questions 12, 13, 14 - you'll need to open the bonnet and tell the examiner how you would actually do the check.
‘Show Me’ example questions
You will show the examiner how to do these whilst your driving, but only demonstrate when its safe to do so.
1. When it’s safe to do so, show me how you'd wash and clean the rear windscreen.
In most cars you simply either pull backwards on the wipers stalk or push a button on the end of the wipers stalk (make sure you know how to identify this stalk). You will almost certainly need the ignition turned on. Some cars will turn the rear windscreen wiper on if it's raining and they have rain sensors when you put it in reverse, but they won't activate the spraying nozzle.
2. When it’s safe to do so, show me how you'd wash and clean the front windscreen.
(a) Activate the front window cleaning switch or wipers stalk / wand.
Note: With the rear windscreen washer it's most commonly activated either by pushing the washer wand forwards or turning the end of the washer wand (often one click further than it would take to turn on the rear wiper).
3. When it’s safe to do so, show me how you’d switch on your dipped headlights.
Simply turn the dipped headlights switch on.
4. When it’s safe to do so, show me how you’d set the rear demister.
5. When it’s safe to do so, show me how you’d demist the front windscreen.
The examiner may ask you to just show how to clear the rear or front rather than all windows. You won't need to start the engine for this demonstration, just show which controls you would set. Some new vehicles have one button that does it all, but you should show the examiner that you know that you should turn the temperature up, the fan on high, the air conditioning on, the rear demister button on and also set the direction of airflow to the windscreen as opposed to, say, blowing at your feet.
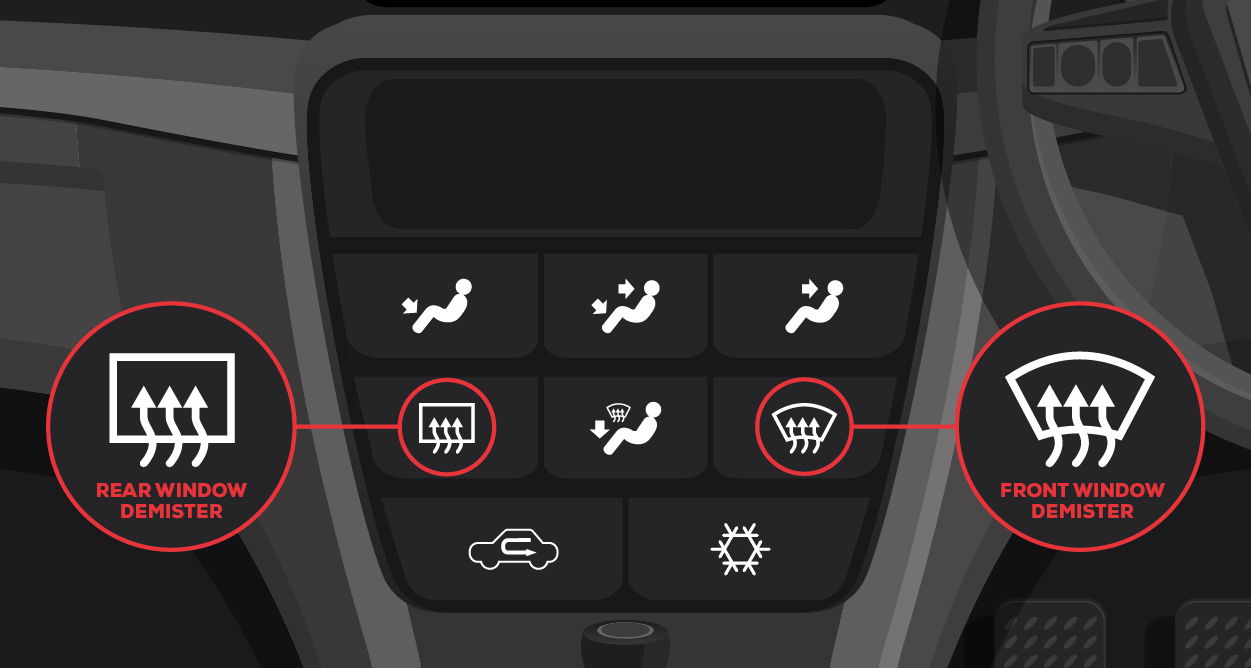
Note: The rear demister sends a current through wires embedded in the rear window, clearing it of condensation.
5. When it’s safe to do so, show me how you’d operate the horn.
Press the horn (either in the centre of the steering wheel, but is sometimes on a stalk)
Note: The horn will work regardless of whether you have the ignition on or off.


